
【SANGO】内部リンクに「続きを読む」を入れるカスタマイズ
完成イメージ
Before

After
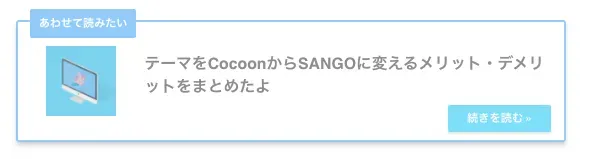
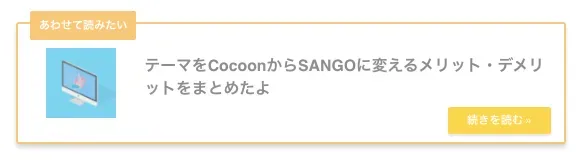
ライトブルーとオレンジの2色をサンプルとして作りました。
- 「あわせて読みたい」という文言を加えることで関連記事と分かりやすいように
- 全体的に少し透明にすることで記事内で浮かないように
- 薄い影を加えてより目立ちやすく
カスタマイズ方法
0. バックアップを忘れずに
早速カスタマイズしていきたいところですが、万が一の事態に備えて事前にバックアップを取っておくことをおすすめします。
その方法について詳しくは下記記事にまとめているでぜひ参考にしてください。
![]() WordPressでCSSのバックアップをとる方法【カスタマイズ時に必須】
WordPressでCSSのバックアップをとる方法【カスタマイズ時に必須】
1. CSSを追記
ライトブルー
.linkto {  position: relative;  z-index: 0;  padding: 0.9rem 1rem 1.5rem;  margin: 0 auto;  font-size: 0.95em;  color: #707070;  border-color: #92ccfb !important; /* 枠線の色 */  box-shadow: 0 4px 4px rgb(0 0 0 / 13%), 0 2px 3px -2px rgb(0 0 0 / 12%); /* 本体の影 */}
.linkto span {  opacity: 0.8;}
.linkto:hover {  background-color: initial;  opacity: 0.9;  transform: scale(1.04);}
.linkto img {  z-index: 0;  max-width: 70%;  margin-top: 10px;  margin-left: 0.7rem;  box-shadow: initial;}@media only screen and (max-width: 480px) {  .linkto img {    max-width: 65%;    margin-left: 0.7rem;  }}
.linkto::before {  position: absolute;  top: -0.8rem;  left: auto;  z-index: 1;  padding: 0.4em 0.8em;  margin-left: -0.4em;  font-size: 0.6rem;  font-weight: bold;  color: #fff; /* 「あわせて読みたい」の文字色 */  content: "あわせて読みたい";  background-color: #92ccfb; /* 「あわせて読みたい」の背景色 */  border-radius: 2px;}
.linkto::after {  position: absolute;  right: 1rem;  bottom: 0.5rem;  z-index: 1;  padding: 0.3em 1.7em;  font-size: 0.7rem;  font-weight: bold;  color: #fff; /* 「続きを読む」の文字色 */  content: "続きを読む \0bb";  background-color: #73dafb; /* 「続きを読む」の背景色 */  border-radius: 2px;  box-shadow: 0 2px 2px rgb(0 0 0 / 10%);  opacity: 0.9;  transform: translateX(3px);}@media screen and (min-width: 480px) {  .linkto::before {    font-size: 0.7em;  }}
オレンジ
.linkto {  position: relative;  z-index: 0;  padding: 0.9rem 1rem 1.5rem;  margin: 0 auto;  font-size: 0.95em;  color: #707070;  border-color: #f8c678 !important; /* 枠線の色 */  box-shadow: 0 4px 4px rgb(0 0 0 / 13%), 0 2px 3px -2px rgb(0 0 0 / 12%); /* 本体の影 */}
.linkto span {  opacity: 0.8;}
.linkto:hover {  background-color: initial;  opacity: 0.9;  transform: scale(1.04);}
.linkto img {  z-index: 0;  max-width: 70%;  margin-top: 10px;  margin-left: 0.7rem;  box-shadow: initial;}@media only screen and (max-width: 480px) {  .linkto img {    max-width: 65%;    margin-left: 0.7rem;  }}
.linkto::before {  position: absolute;  top: -0.8rem;  left: auto;  z-index: 1;  padding: 0.4em 0.8em;  margin-left: -0.4em;  font-size: 0.6rem;  font-weight: bold;  color: #fff; /* 「あわせて読みたい」の文字色 */  content: "あわせて読みたい";  background-color: #f8c678; /* 「あわせて読みたい」の背景色 */  border-radius: 2px;}
.linkto::after {  position: absolute;  right: 1rem;  bottom: 0.5rem;  z-index: 1;  padding: 0.3em 1.7em;  font-size: 0.7rem;  font-weight: bold;  color: #fff; /* 「続きを読む」の文字色 */  content: "続きを読む \0bb";  background-color: #ffd242; /* 「続きを読む」の背景色 */  border-radius: 2px;  box-shadow: 0 2px 2px rgb(0 0 0 / 10%);  opacity: 0.9;  transform: translateX(3px);}@media screen and (min-width: 480px) {  .linkto::before {    font-size: 0.7em;  }}
上記コードを、テーマで読み込んでいるCSSファイルにコピペします。
CSSを編集する方法について、詳しくは下記記事にまとめているでぜひ参考にしてください。
![]() 【初心者向け】WordPressでCSSを編集・追加する方法
【初心者向け】WordPressでCSSを編集・追加する方法
![]() 【WordPress】CSSの変更が反映されない場合の原因・対処法
【WordPress】CSSの変更が反映されない場合の原因・対処法
もし任意の色を適用したい場合は、コピペしたCSSの/* 〇〇色 */とコメントしている箇所をお好みの色にしてください。
2. お好みの文言に変える
.linkto::before {  position: absolute;  top: -0.8rem;  left: auto;  z-index: 1;  padding: 0.4em 0.8em;  margin-left: -0.4em;  font-size: 0.6rem;  font-weight: bold;  color: #fff; /* 「あわせて読みたい」の文字色 */  content: "あわせて読みたい";  content: "<任意の文言>";  background-color: #f8c678; /* 「あわせて読みたい」の背景色 */  border-radius: 2px; }
 .linkto::after {   position: absolute;   right: 1rem;   bottom: 0.5rem;   z-index: 1;   padding: 0.3em 1.7em;   font-size: 0.7rem;   font-weight: bold;   color: #fff; /* 「続きを読む」の文字色 */   content: "続きを読む \0bb";   content: "<任意の文言>";   background-color: #ffd242; /* 「続きを読む」の背景色 */   border-radius: 2px;   box-shadow: 0 2px 2px rgb(0 0 0 / 10%);   opacity: 0.9;   transform: translateX(3px); }
「あわせて読みたい」や「続きを読む」の文言を変えたい場合は、上記箇所を修正してください。
以上でカスタマイズは完了です 🎉
他のSANGOカスタマイズも全て下記記事にまとめているので、ぜひ参考にしてください。
![]() 【SANGOカスタマイズ総まとめ】サイトをもっと魅力的に!
【SANGOカスタマイズ総まとめ】サイトをもっと魅力的に!