
【Rails】deviseを使ってログイン認証を実装する方法
そもそもdeviseとは
deviseはログイン認証機能を簡単に実装できるgemの1つ。
加えてメール認証機能やTwitter連携などもお手軽に実装できます。
ログイン認証の実装方法
1. プロジェクトを作成する
$ rails new line --skip-coffeeまずアプリケーションを作成します。
2. gemをインストール
gem 'devise'bundle installGemfileにdeviseを追記し、インストールします。
3. deviseの設定
rails g devise:install上のようにコマンドを叩きます。
Running via Spring preloader in process 27916      create config/initializers/devise.rb      create config/locales/devise.en.yml===============================================================================
Depending on your application's configuration some manual setup may be required:
  1. Ensure you have defined default url options in your environments files. Here     is an example of default_url_options appropriate for a development environment     in config/environments/development.rb:
       config.action_mailer.default_url_options = { host: 'localhost', port: 3000 }
     In production, :host should be set to the actual host of your application.
     * Required for all applications. *
  2. Ensure you have defined root_url to *something* in your config/routes.rb.     For example:
       root to: "home#index"
     * Not required for API-only Applications *
  3. Ensure you have flash messages in app/views/layouts/application.html.erb.     For example:
       <p class="notice"><%= notice %></p>       <p class="alert"><%= alert %></p>
     * Not required for API-only Applications *
  4. You can copy Devise views (for customization) to your app by running:
       rails g devise:views
     * Not required *
===============================================================================
すると上のような出力がされるかと思います。
噛み砕くと、以下のような意味です。
- メールで必要になる認証リンクのURLを設定してください
- トップページのルーティングを設定してください
- アラートを設置してください
- 見た目を変えたかったらビューを作ってください
このガイドに沿って、まずURLの設定とアラート達の設置をしていきます。
4. 認証リンクのURLの設定
まずURLの設定とアラート達の設置をしていきます。config/environments/development.rbに上のように追記します。
5. アラートの設置
次にログインメッセージなどを表示するためにアラートを設定していきます。
<% if flash.notice %> <p class="notice"><%= notice %></p><% end %><% if flash.alert %> <p class="alert"><%= alert %></p><% end %>上記の要素を、application.html.erbのbodyタグの直下辺りに追記します。
6. 認証モデルを作る
$ rails g devise userログイン目的のuserモデルでを作成。このモデルでパスワードやメールアドレスなどを扱っていきます。
7. ルーティングを追加
Rails.application.routes.draw do devise_for :users devise_scope :user do#トップページをログイン画面に root "users/sessions#new" endendログイン画面をルートディレクトリにしたいので上のようにroutes.rbに追記します。
classApplicationController < ActionController::Base def after_sign_in_path_for(resource) "<ログイン後に遷移させたいページ>" endendapplication_controller.rbに、ログイン後にリダイレクトするためのメソッドを追加します。
$ rails db:migrateそしてマイグレーションを実行してあげればOK。
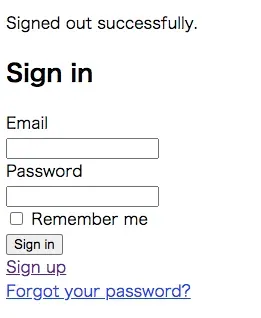
localhost:3000がログイン画面になっていれば、ログイン機能は実装完了です。
deviseを日本語化する方法
deviseはデフォルトの設定が英語になっていますが、日本語化も簡単にできます。
gem 'devise-i18n'gem 'devise-i18n-views'$ bundle installまず上記2つのgemをインストール。
require_relative 'boot'require 'rails/all'
# Require the gems listed in Gemfile, including any gems# you've limited to :test, :development, or :production.Bundler.require(*Rails.groups)
module Line class Application < Rails::Application # Initialize configuration defaults for originally generated Rails version. config.load_defaults 5.2 config.i18n.default_locale = :jaそうしたらconfig/apprication.rbに対して上のように追記します。
rails g devise:views:locale ja最後に上のコマンドを叩いてあげればOK。
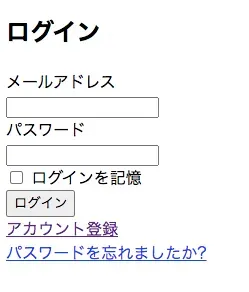
ログインフォームが無事日本語化されていますね。
ビューやコントローラーのカスタマイズ方法
rails g devise:viewsrails g devise:controllers users上記のコマンドを叩くことで専用のビュー・コントローラーが生成されるので、独自の処理を追加することが可能になります。