
【Rails】Action Cableで非同期かつ双方向なチャット機能を実装する
チャット機能の完成イメージ
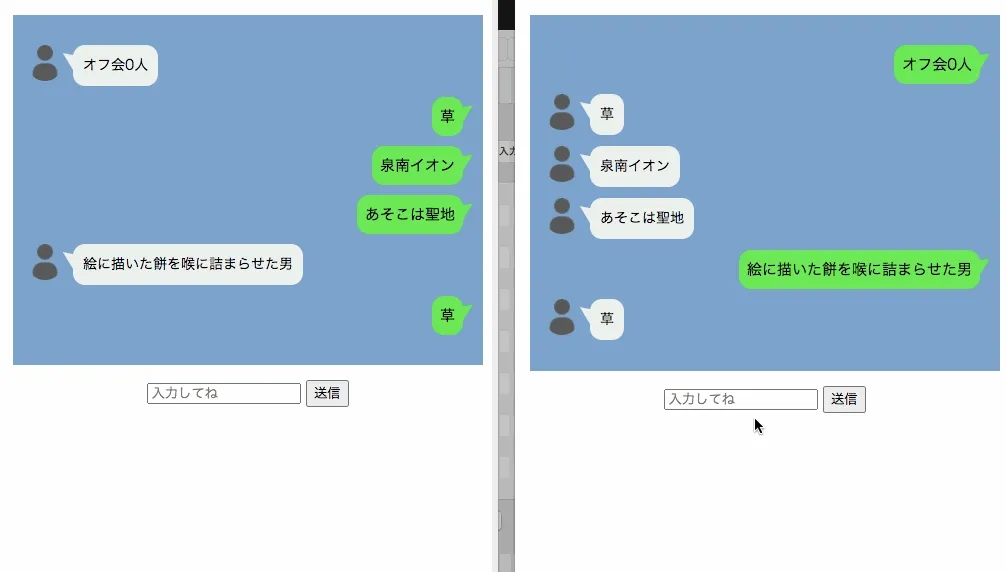
それぞれ別のブラウザウィンドウを開き、異なるユーザーとしてログインしていますが、互いにリアルタイムでチャットができます。
実装方法
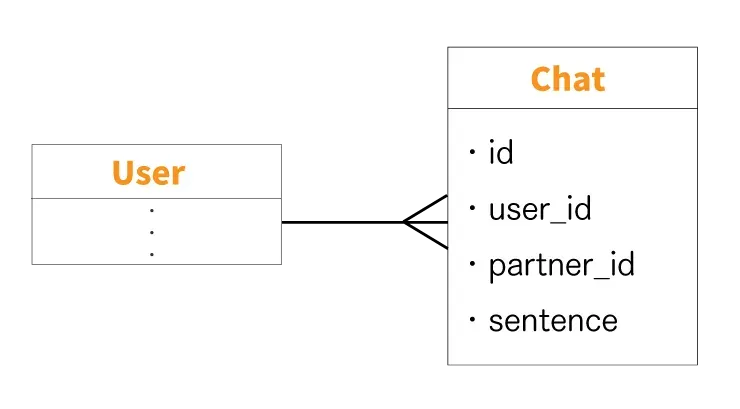
前提として、今回は上のようにUserモデルとChatモデルの2つを作成します。
UserモデルとChatモデルは1対多の関係Chatモデルのpartner_idはチャット相手Userモデルは「devise」の認証モデルとして作成
1. deviseでログイン認証機能を実装
まず「devise」というgemを使い、Userモデルを作成しつつログイン認証機能を実装します。
詳しくは以下の記事を参考にしてください。
2. Chatモデルの作成
$ rails g model chatresources :chats3. モデル間の関連付け
class Chat < ApplicationRecord belongs_to :userendclass User < ApplicationRecord has_many :chats, dependent: :destroy4. マイグレーション実行
class CreateChats < ActiveRecord::Migration[5.2] def change create_table :chats do |t| t.references :users, null: false t.integer :partner_id, null: false #チャット相手 t.string :sentence, null: false t.timestamps end endend$ rails db:migrate5. コントローラー作成
$ rails g controller chats index showclass ChatsController < ApplicationController def index @my_chats=current_user.chats @chat_partners=User.where.not(id:current_user.id)#自分以外 end
def show @partner=User.find(params[:id])
@chats_by_myself=Chat.where(user_id: current_user.id,partner_id: @partner.id) @chats_by_other=Chat.where(user_id: @partner.id,partner_id: current_user.id)
@chats=@chats_by_myself.or(@chats_by_other) # リレーションオブジェクト達を結合する @chats=@chats.order(:created_at) endendindexアクションでトークルーム一覧、showアクションでチャットルームのやりとりを表示しています。
9行目以降は「送信したのが自分、もしくは送信されたのが自分」なチャットを取得し、それらのモデルオブジェクト達を結合させています。
6. ビューの作成
<table class="rooms"> <tbody> <tr> <td> <% @chat_partners.each do |chat_partner| %> <%= link_to "#{chat_partner.email}さんとのトークルーム","/chats/#{chat_partner.id}" %> <%end%> </td> </tr> </tbody></table><%= link_to("ログインページへ","/") %><%= link_to("ログアウトする","/users/sign_out",method: :delete )%>トークルーム一覧を表示するindex.html.erbを作成します。
<h2 style="text-align:center"> <%= "#{@partner.email}さんとのチャット" %></h2><div id="chats"> <% @chats.each do |chat| %> <% if chat.user_id==current_user.id %> <div class="mycomment"> <p><%= chat.sentence %></p> </div> <%else%> <div class="fukidasi"> <div class="faceicon"> <img src="/assets/profile.png" alt="相手"> </div> <div class="chatting"> <div class="says"> <p><%= chat.sentence %></p> </div> </div> </div> <%end%> <%end%></div><form id="send-form"> <input type="text" id="sentence" placeholder="入力してね" style="width:30%;"> <input type="submit" value="送信" id="send"> <input id="current_user_id" type="hidden" value= "<%=current_user.id%>"> <input id="partner_id" type="hidden" value= "<%=@partner.id%>"></form><%= link_to("ログアウトする","/users/sign_out",method: :delete) %>次にトークルームを表示するshow.html.erbを作成します。
7. チャット画面のスタイリング
/************************************** トークルーム一覧************************************/.rooms {  margin: 0 auto;  background-color: #fdfdfd;  border: 2px solid #eee;  padding: 1em 2em;}/************************************** チャットの吹き出し************************************/#chats {  padding: 20px 10px;  max-width: 450px;  margin: 15px auto;  text-align: right;  font-size: 14px;  background: #7da4cd;}
.fukidasi {  width: 100%;  margin: 10px 0;  overflow: hidden;}
.fukidasi .faceicon {  float: left;  margin-right: -50px;  width: 40px;}
.fukidasi .faceicon img {  width: 90%;  height: auto;  border-radius: 50%;}
.fukidasi .chatting {  width: 100%;  text-align: left;}
.says {  display: inline-block;  position: relative;  margin: 0 0 0 50px;  padding: 10px;  max-width: 250px;  border-radius: 12px;  background: #edf1ee;}
.says:after {  content: "";  display: inline-block;  position: absolute;  top: 3px;  left: -19px;  border: 8px solid transparent;  border-right: 18px solid #edf1ee;  -webkit-transform: rotate(35deg);  transform: rotate(35deg);}
.says p {  margin: 0;  padding: 0;}
.mycomment {  margin: 10px 0;}
.mycomment p {  display: inline-block;  position: relative;  margin: 0 10px 0 0;  padding: 8px;  max-width: 250px;  border-radius: 12px;  background: #30e852;  font-size: 15px;}
.mycomment p:after {  content: "";  position: absolute;  top: 3px;  right: -19px;  border: 8px solid transparent;  border-left: 18px solid #30e852;  -webkit-transform: rotate(-35deg);  transform: rotate(-35deg);}
/************************************** 送信フォーム************************************/#send-form {  text-align: center;  margin-bottom: 200px;}
チャット画面をLINE風にスタイリングします。
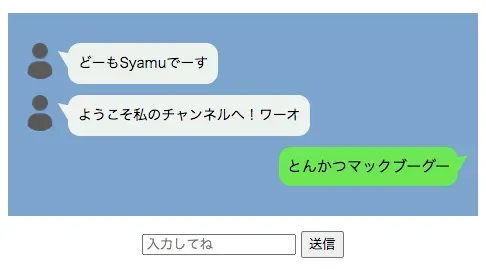
localhost:3000/users/showにアクセスし、フォームに入力してボタンを押してリロードします。
すると先ほど投稿したメッセージが表示され、これで単方向の送信は実現できました。
8. jQueryを使えるようにする
gem 'jquery-rails'$ bundle installまずgemをインストール。
//= require rails-ujs//= require activestorage//= require turbolinks//= require jquery//= require jquery_ujs//= require_tree .application.jsに上のように追記することでjQueryが使えるようになります。
9. Chatチャンネルを作成
$ rails g channel chat speakこれでchat.jsとchat_channel.rbが生成されます。
chat.jsにはフロント側の処理を、chat_channel.rbにはサーバ側の処理を書いていきます。
10. ログイン中のユーザーを取得
module ApplicationCable  class Connection < ActionCable::Connection::Base  # channelでcurrent_userが使えるようにする  identified_by :current_user
    def connect      self.current_user = find_verified_user    end
    protected    def find_verified_user      verified_user = User.find_by(id: env['warden'].user.id)      return reject_unauthorized_connection unless verified_user      verified_user    end
def session cookies.encrypted[Rails.application.config.session_options[:key]] end endendchannels/applicationcable/connection.rbを上のように実装。
これでChatChannelでcurrent_userが呼べるようになり、ログインしているユーザーを取得できるようになります。
11. chat.jsの実装
App.chat = App.cable.subscriptions.create("ChatChannel", { connected: function () { // Called when the subscription is ready for use on the server }, disconnected: function () { // Called when the subscription has been terminated by the server }, received: function (data) { // 画面を開いているのがチャット送信者だった場合 if (data["isCurrent_user"] == true) { sentence = `<div class='mycomment'><p>${data["sentence"]}</p></div>`; } // 画面を開いているのがチャット受信者だった場合 else { sentence = `<div class='fukidasi'><div class='faceicon'> <img src='/assets/profile.png' alt='管理人'></div> <div class='chatting'><div class='says'><p>${data["sentence"]}</p> </div></div></div>`; } $("#chats").append(sentence); }, speak: function (sentence) { current_user_id = $("#current_user_id").val(); partner_id = $("#partner_id").val(); return this.perform("speak", { sentence: sentence, current_user_id: current_user_id, partner_id: partner_id, }); },});$(function () { $("#send").on("click", function (e) { sentence = $("#sentence").val(); App.chat.speak(sentence); $("#sentence").val(""); // フォームを空に e.preventDefault(); });});- 送信ボタンがクリックされたら
speakメソッドを呼び出す speakメソッドでは色々値を取得してサーバ側のspeakメソッドに渡しているrecievedメソッド以降はサーバから値を受けとり、要素を追加している(チャットの内容を表示している)
今画面を開いているのがチャットを送信したユーザーなら右に、受信したユーザーなら左に吹き出しを追加しています。
12. chat_channel.rbの実装
class ChatChannel < ApplicationCable::Channel  def subscribed    stream_from "chat_channel"    stream_for current_user.id  end
  def unsubscribed    # Any cleanup needed when channel is unsubscribed  end
  def speak(data)    if data["sentence"]      Chat.create!(        user_id: data["current_user_id"].to_i,        partner_id: data["partner_id"].to_i ,        sentence: data["sentence"]      )      # 画面を開いているのがチャット送信者だった場合      ChatChannel.broadcast_to data["current_user_id"].to_i,        sentence: data["sentence"],        partner_id: data["partner_id"],        isCurrent_user: true
# 画面を開いているのがチャット受信者だった場合 ChatChannel.broadcast_to data["partner_id"].to_i, sentence: data["sentence"], partner_id: data["partner_id"], isCurrent_user: false end endendchat_channel.rbで、フロント側から送られてきたデータを元にチャットのレコードを作成・保存します。
subscribedメソッドは接続が確立された時の処理。stream_forでcurrent_user.idを指定することで、今画面開いているユーザーに関連するストリームを作成broadcast_toで今画面開いているユーザーがチャット送信者なのか否かを判定し、送信するデータ(isCurrent_userの値)を変更
双方向のチャットができるようになりました。これで完成です 🎉